How To Play Cut The Rope on Your TV
fighting lgtv's webOS
[wency suo, jesus fileto]

intro
It might come as a surprise to most that CutTheRope(CTR), a childhood banger of a game, has a TV distribution on LGTV platforms. The game features the same rope cutting, bubble popping, and whoopee cushion squeezing mechanics modified for a remote controller.
We played significantly more than a few levels on the TV and long story short now the remote is lagging because we’ve drained the battery playing so much CTR.
Having decided that replacing a TV remote battery was simply too difficult, we decided that the remote was unecessary and built a way to play CTR on the TV without it :)
brainstorming
What does it actually look like to play CTR on the TV without a remote? While brainstorming control interface designs, we can generalize this problem statement to simply:
how can we remotely control TVs without a little plastic box that natively speaks to our tvOS via a mix of bluetooth and infrared signals?
With this pretty vague problem statement, let’s define some more concrete project goals that will help tighten the design:
- Accuracy! It can be frustrating to play with the remote since it’s not very sensitive, are there ways to improve this?
- Reduce lag and intuitive game controls
- Identify a consistent playing surface that's easy for the user to interact with
- Actually cut the ropes and interact with other in game elements
- Beat some levels with our setup
Design 0: gesture recognition on laptop with webcam
As a proof of concept, we wanted to start by seeing if we could play a web-based port of CTR on a laptop with the webcam for gesture recognition.
To build this we relied primarily on computer vision tools like OpenCV and MediaPipe. If you see videos or photos of other people’s projects that use vision recognition, there’s a good chance that at least a portion of their code or a dependency uses OpenCV. OpenCV contains the webcam control and frame processing code we need, wrapped nicely in the VideoCapture class. The class allows you to read a stream of frames from a video file, camera, or image sequence making the setup for frame by frame manipulation a 5 lines-of-code problem. Since we’re using the webcam input channel, OpenCV also spins up a live video player on my laptop when running the program to make visualization super easy.
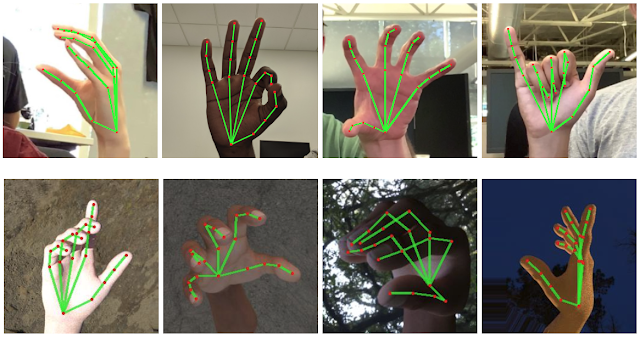
MediaPipe provides access to the hand gesture recognition models that are applied to the video data captured by the webcam. Google has several image recognition models in MediaPipe to choose from. We initially experimented with a simple hand recognition model for point tracking but decided to use specifically a gesture recognition model to easily map in-game controls.
For this version of our code, we used 👆 for dragging, 🖐 as a neutral do nothing but move the cursor. 👊 as our click.
Recognizing gestures is only half the problem. Now we need to use a tool like PyAutoGUI, a programmatic gui controller, to actually send native mouse controls like drag, click, cursor movements to my laptop. Each movement is broken down into two steps, pyautogui.moveTo(x,y) and pyautogui.mouseUp() or mouseDown().
At this stage, we noticed that the gesture recognition model really struggled with recognizing hand gestures that were incomplete or on the edges of the image so we added a small non-playable margin within the full image as an easy fix. All of this gives us a functional, albeit basic, way to control the game via webcam!
You’ll notice that this PoC ignores a big part of our CTR-for-TV dream: LG’s proprietary tvOS…
Design 1: gesture control on TV with laptop webcam
Moving from local laptop control to the TV meant we had to figure out how the TV expects to receive mouse events. This means figuring out how command packets were being sent from the remote to the TV in order to mimic the dragging motion of LG’s Magic Remote. I’m not sure how accessible other tvOS’s are but the target audience for LG TV’s WebOS seems largely to be app developers for the ecosystem. Not many of them are trying to optimize for the smoothest remote-less CTR experience, much to our dismay.
connecting to the tv
LG’s webOS exposes a websocket that apps and remote-control clients can use to communicate with the TV. Our client connects to a secure local websocket endpoint on port 3001, registers itself with the TV, and receives a client key after the user approves the connection.
The key can then be saved locally and reused so the TV does not ask for permission every time the app launches. The commands are then sent through a secondary websocket dedicated to mouse and keyboard inputs.
communing with the tv
After some initial testing we quickly realized that WebOS was going to be a pain for us to work with. LG has proprietary message encodings that are not well documented. Meaning there are any number of private functions that Magic Remote has access to that we don’t even know exist. Values that aren’t used by the TV are ignored, true/false string values do nothing, and missing values actively cause errors in the response payloads.
Through repeatedly sending commands until the tv did something and some snooping through source code, we figured out that the move command sent to WebOS has a hidden parameter called drag that is commonly set to down in order to simulate clicking behavior. This was the key to simulating the click-and-hold necessary to actually “cut” the in-game rope, otherwise we would just be moving from one side of the rope to the other without interacting with it.
fighting with the tv
Tedious experimentation of the controls again revealed some more limiting features of the WebOS movement command. Move commands are all relative to the cursor position which is set to the center position on the TV or (0,0). So move(x,y) is really move(dx, dy). This was fine to work around once discovered, we just have to translate pixels to a coordinate system with (0,0) in the middle of the screen. We thought this would introduce little processing overhead, however getting this to work correctly was probably the hardest part of this project.
Having to recalculate constantly the relative move commands given the detected hand position from the camera feed forced us to keep an internal cursor state that recorded its absolute position and if it was dragging or not. The TV sometimes resets or recenters the cursor after a period of inactivity. So our code needed to also track the time of the previous movement. If less than about 5.5 seconds have passed, it assumes the cursor is still where we left it and sends a delta from the stored position. Otherwise we would need to treat the next movement as originating from (0,0).
This wasn't a particularly elegant calibration system but it was enough to keep the prototype moving in roughly the right direction.
moving pixel by pixel
I like to make extragerated gestures across the camera, full of drama, in an effort to cut the rope when I'm playing. However, the movements turn out to be pretty chopy if you don't break down the moveTo() commands to small, incremental movements.
To abstract away the relative movement commands we used a custom moveArbDistance function which takes any x, y and converts it into a sequence of one-pixel WebOS commands that will get your cursor to the correct final position.
Why 1 pixel at a time, you might ask?
Initially we assumed that dx and dy represented straightforward posiiton changes. Under that model, sending dx: 3 should move the cursor three times as far as sending dx: 1. In reality the vaues behaved more like a velocity or movement-intensity vector than a discrete pixel offset. So increasing the step size did not produce a clean propotional movement. This was particuarly noticeable during dragging. Larger values made the cursor accelerate or jump across the screen instead of tracing the smooth path of the user's hand.
Using stepsize of 1 ended up being the smoothest way to produce dragging without the cursor jumping all over the screen. So after this, pure horizontal becomes repeated dx steps and pure vertical becomes repeated dy steps. Any diagonal movement uses a basic slope ratio that alternates between horizontal and vertical steps for stable movement. We also had to account for jitter at this point, for example if the user sits at the center of the screen for some amount of time, we need to send tiny (1, 1) and (-1, -1) steps to keep it in place.
At this point if you're still reading i think you might guess what became our biggest headache. decompressing single movements into tiny steps works well if you don't move too far but this can easily send hundreds or thousands of move requests to the tvOS server, all of which take some time to process. Additionaly, if any requests failed the internal cursor state will drift from the real cursor position and the calcualted relative movements would be incorrect.
A serial dispatch queue helped us confirm that the messages would at least be sent in order. Without serialization, overlapping drag and movement commands could arrive in an exciting but incorrect sequence. If we had more time to improve the project, I would definetly spend more time designing the cursor state management or testing the WebOS commands to see if we can stablize long continuous movement without sending too many requests to get match to the movement smoothness of the Magic Remote.
At this point though, we do have a playable CTR tv version that's controlled from my mac webcam.
But holding your hand in front of the laptop while looking sideways at a television is not a particularly natural way to play. We wanted the controls to feel more like touching a physical game board.
Design 2: table top gesture control and tv via lidar
Design 2 is anchored by the idea of playing CTR on our coffee table top. This would be similar enough to a giant trackpad for the TV or a futureistic terminal ipad console thing that seem to always appear in scifi spaceships.
A phone is mounted approximately 2 feet above the table, looking downward. The camera tracks the player's fingertips while the depth sensor determines when those fingertips were close enough to the tabletop to count as a touch.
Moving your finger above the table would do nothing (hovering!). Touching the table would produce a click. Sliding your finger while touching the table woudl drag across the tv screen and cut a rope. We built a quick SwiftUI iOS app called WirelessCandy. Apple nicely packages lidar data access and some cool AR features into RealityKit and ARKit.
teaching my phone how to identify my table
The app’s root ContentView is intentionally minimal. Most of the screen is occupied by a full-screen RealityKit ARView.
Apple has a nice plane detection feature that we can enable in the configuration:
config.planeDetection = [.horizontal]
config.frameSemantics = .sceneDepth
Scene depth is the useful part. On supported devices in our case we used an iPhone 14 Pro, ARKit produces a depth map estimating the distance between the phone and each part of the camera image. We use that map to check if a detected fingertip is hovering over the table or physically touching it.
An ARSessionDelegate receives each new camera frame:
func session(_ session: ARSession, didUpdate frame: ARFrame) {
    // Hand tracking and collision detection happen here
}
finding fingertips with Vision
For every AR frame, we run a VNDetectHumanHandPoseRequest.
Vision returns recognized hand landmarks, including the tips of all five fingers:
.thumbTip
.indexTip
.middleTip
.ringTip
.littleTip
We collect the recognized points for each visible hand and pass them into the depth-processing pipeline.
Why all five fingertips instead of just the index finger?
Partially because it makes the interaction more flexible but mostly because detecting five potential collision points made us more certain of the user's hand position. Depending on the angle of the phone and how far the user is from the camera the depth data may not be accurate. Initially, the collision detection was too sensitive and anchoring to a index-middle-ring finger bundle for collision detection worked much better for us.
detecting a fingertip-table collision
To detect a fingertip-table collision we need to convert position data between several different coordinate spaces:
- Convert the fingertip location into the depth map's coordinate space.
- Sample the depth value at that location.
- Use the camera intrinsics to reconstruct the corresponding 3D camera-space point.
- Transform the point from camera coordinates into AR world coordinates.
- Transform it again into the table plane’s local coordinate system.
- Measure its distance from the plane.
Camera intrinsics describe how 3D points are projected onto the camera image. To match the resolution of the depth map to the camera image, we scale the intrinsic matrix before reconstructing the point.
This way a depth pixel becomes a camera-space position:
x = (pixelX - centerX) * depth / focalX
y = (pixelY - centerY) * depth / focalY
z = depth
Luckily, ARKit gives us the camera transform needed to move that point into world space. We then apply the inverse table transform to express it relative to the detected table.
If the point is within approximately five centimeters of the table plane, we treat it as a potential collision:
distance < 0.05The final version should use the absolute distance after confirming the plane’s sign convention. Otherwise, a point far below the table could theoretically be considered “close” simply because its signed distance is negative.
Once a fingertip is close enough, we project it onto the table and check whether the point falls within the table plane’s detected bounds.
This converts a real finger touching a real table into a two-dimensional point we can draw on the TV :)
deciding between clicks and drags
A single table collision should behave like a click but a collision that continues across multiple frames should behave like a drag.
The coordinator stores whether the previous frame contained a collision:
hadCollisionLastFrameThe current frame becomes a drag when both conditions are true:
isDragging =
    hadCollisionLastFrame &&
    !collidedPointsInPlane.isEmpty
This gives us a simple interaction state machine:
no contact → no contact: move nothing
no contact → contact: click
contact → contact: drag
contact → no contact: release
So tada! here's the demo of design 1 because I somehow don't have a video of the table version:
things that almost worked
I'll list here a few things that we couldn't debug or discovered too late to design around.
depth data resolution
Apple's ARKit scene-depth map has a resolution of only 256x192 pixels. That gives us 49,152 depth samples spread across the phone's entire field of view. This means that the object tracking of a small fingertip is only occupying a pretty small portion of the depth map. Apple explicitly describes the lidar feature as sa lower-resolution dpeth map chosen so ARKit can run algorithms in real time. So we end up in the awkward state where the camera can properly track the outline of a finger but the depth map doesn't have enough spatial detail to accurately report back the depth position of that finger. As we would try to touch the table with our finger, the depth values around it would often snap to the table's depth value. Instead of reporting one region for the finger and anohter slightly further region for the tabletop the depth mapwould flatten both into the same surface. This was pretty hard to design around since we didn't have other depth data sources available.
Using multiple fingers made the interaction somewhat more stable because we had more samples to work with. But none of this changed the fact that the data was just too low resolution for design 2 :/
processing every frame is expensive
Because AR frame launches hand-pose detection and depth processing, if the vision pipeline takes longer than the camera's frame interval, work can overlap and create a backlog. This accumulates over time and leads to unpredictable behavior of the cursor. Some finetuning of the fps was necessary but didn't solve the issue at the root.
table classification can be temperamental
We only accept planes classified by ARKit as .table.
If ARKit detects the surface but classifies it as unknown, the app sees a perfectly good table and chooses not to believe in it. I would have loved a more comprehensive user setup flow where one could select a plane as a playing service and calibrate it before playing.
conclusion
The 3 prototypes of cut-the-rope-tv we built had varying levels of success. From our original rubric we were able to beat levels consistently, with a little user frustration when it came to design 2. But more importantly:
- We finally touched some fancy AR features and used the lidar sensors in our expensive iphones for something fun.
- Swipe madly across the table to cut the rope.
- Feed Om Nom.
The project was therefore a success.